Welcome to Elisa's Internet service! Setting up a new internet connection may raise a few questions, but don't worry. Our clear instructions will guide you through the process step by step. We've gathered everything you need on this page to make the setup as smooth as possible.
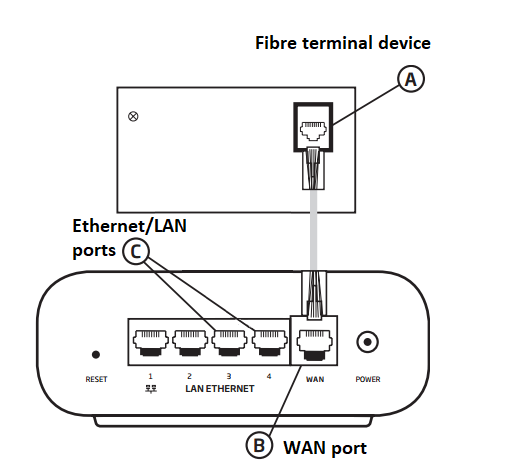
The house has a fibre terminal device to which the fibre cable has been installed. The newest fibre terminal devices have a single LAN port for the broadband connection. You can find more information on the fibre terminal devices for Elisa Valokuitu here (FI).
1. Connect the router from the WAN port (B) to the fibre terminal device (A) with a network cable. The terminal device has either an Ethernet or LAN port for the router.
2. Turn on the router. Check the device manual* for which lights should be lit when the connection is ready to use. Most routers have an internet light that must be lit.
3. Connect computers and other devices to the wireless connection or a network cable to the router’s Ethernet/LAN ports (C). Learn how to connect to a wireless network here (FI).
We recommend using a mesh router (FI) for a fibre connection, which shares the connection to your entire apartment. Check the available devices at our online shop (FI).
Ethernet connections are commonly used in apartment buildings and terraced houses. The following instructions include three different steps that will help you get your connection working.
Step 1: You will need a WiFi router and cables
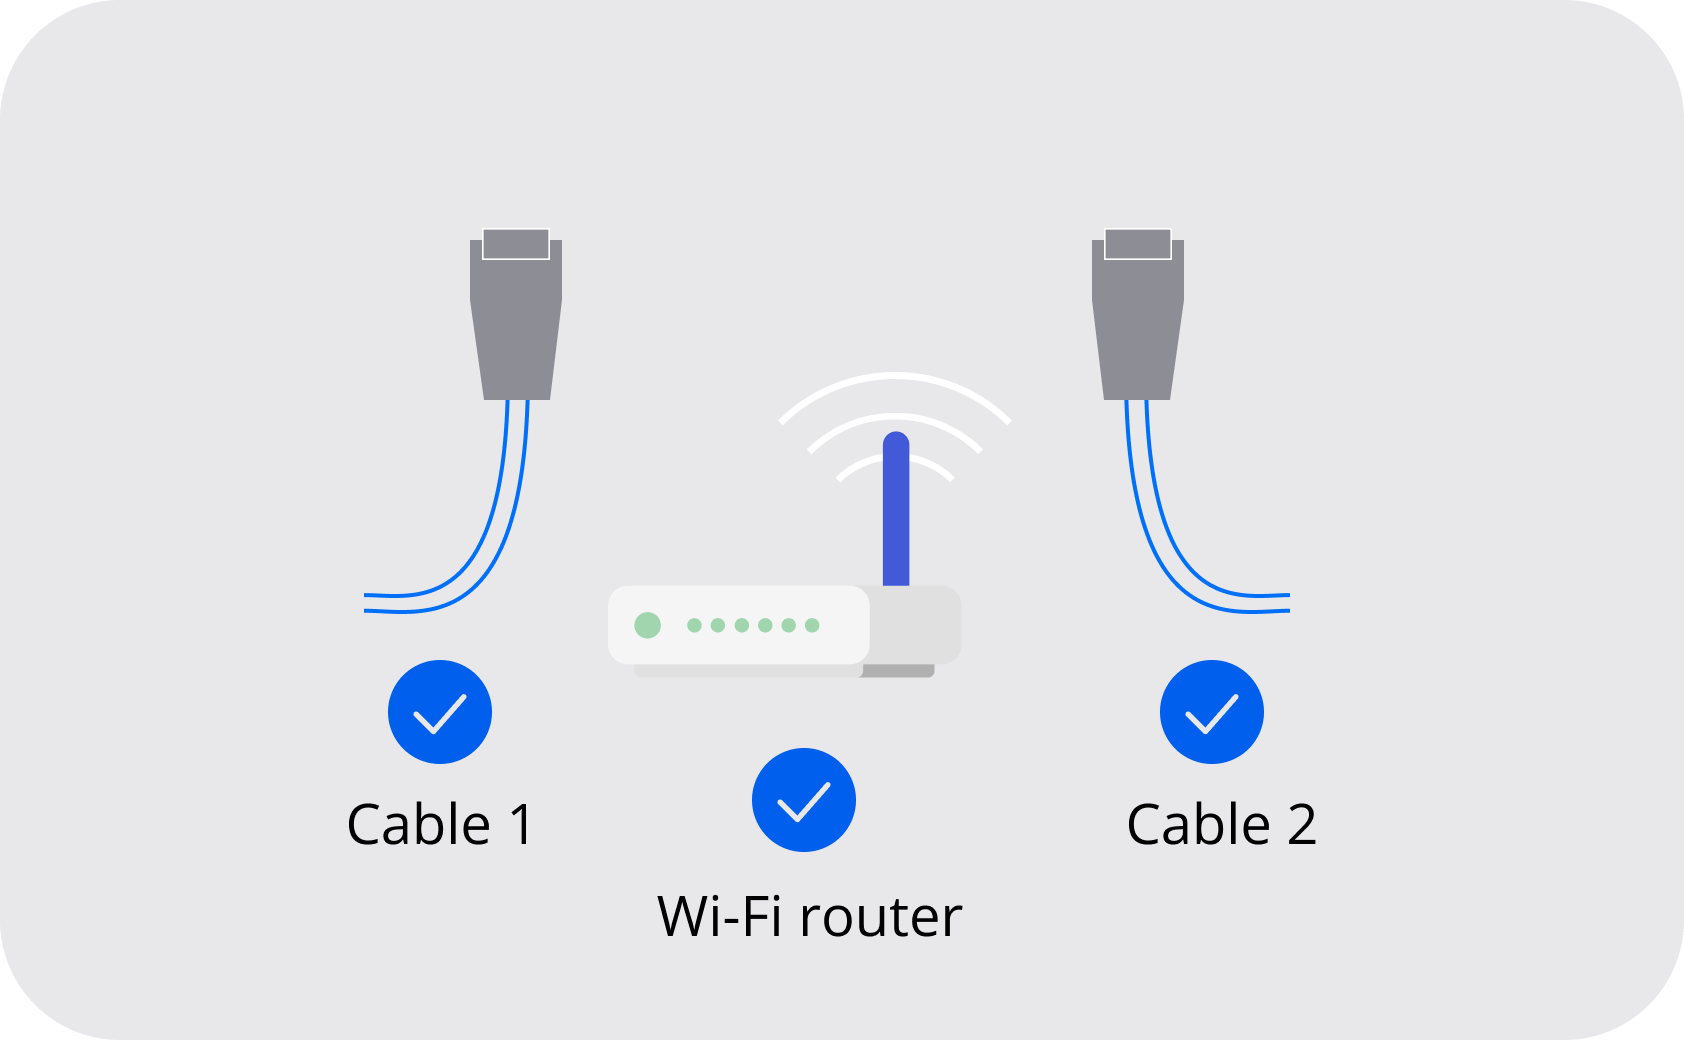
To set up your internet connection, you will need a WiFi router and two cables that create the connection. The WiFi router ensures that your connection is secure and works reliably on your devices. You can share the connection from the router either wirelessly or with a cable to the devices you use.
If you already have your own router, remember that devices have a limited lifespan. We recommend updating your router at least every five years to keep your connection stable and maintain the best possible performance.
If you don’t yet have a WiFi router, you can order one here from Elisa’s online store. The WiFi router includes one cable.
If you need a new cable, we recommend choosing one marked Cat5e, which supports speeds up to 1000 Mbit/s.
|
Elisa does not recommend using the internet connection without a WiFi router
A direct connection from the wall socket to a device, such as a computer, is not protected, which means the connection is not as secure as when using a router. |
Step 2: Place the router in the right spot
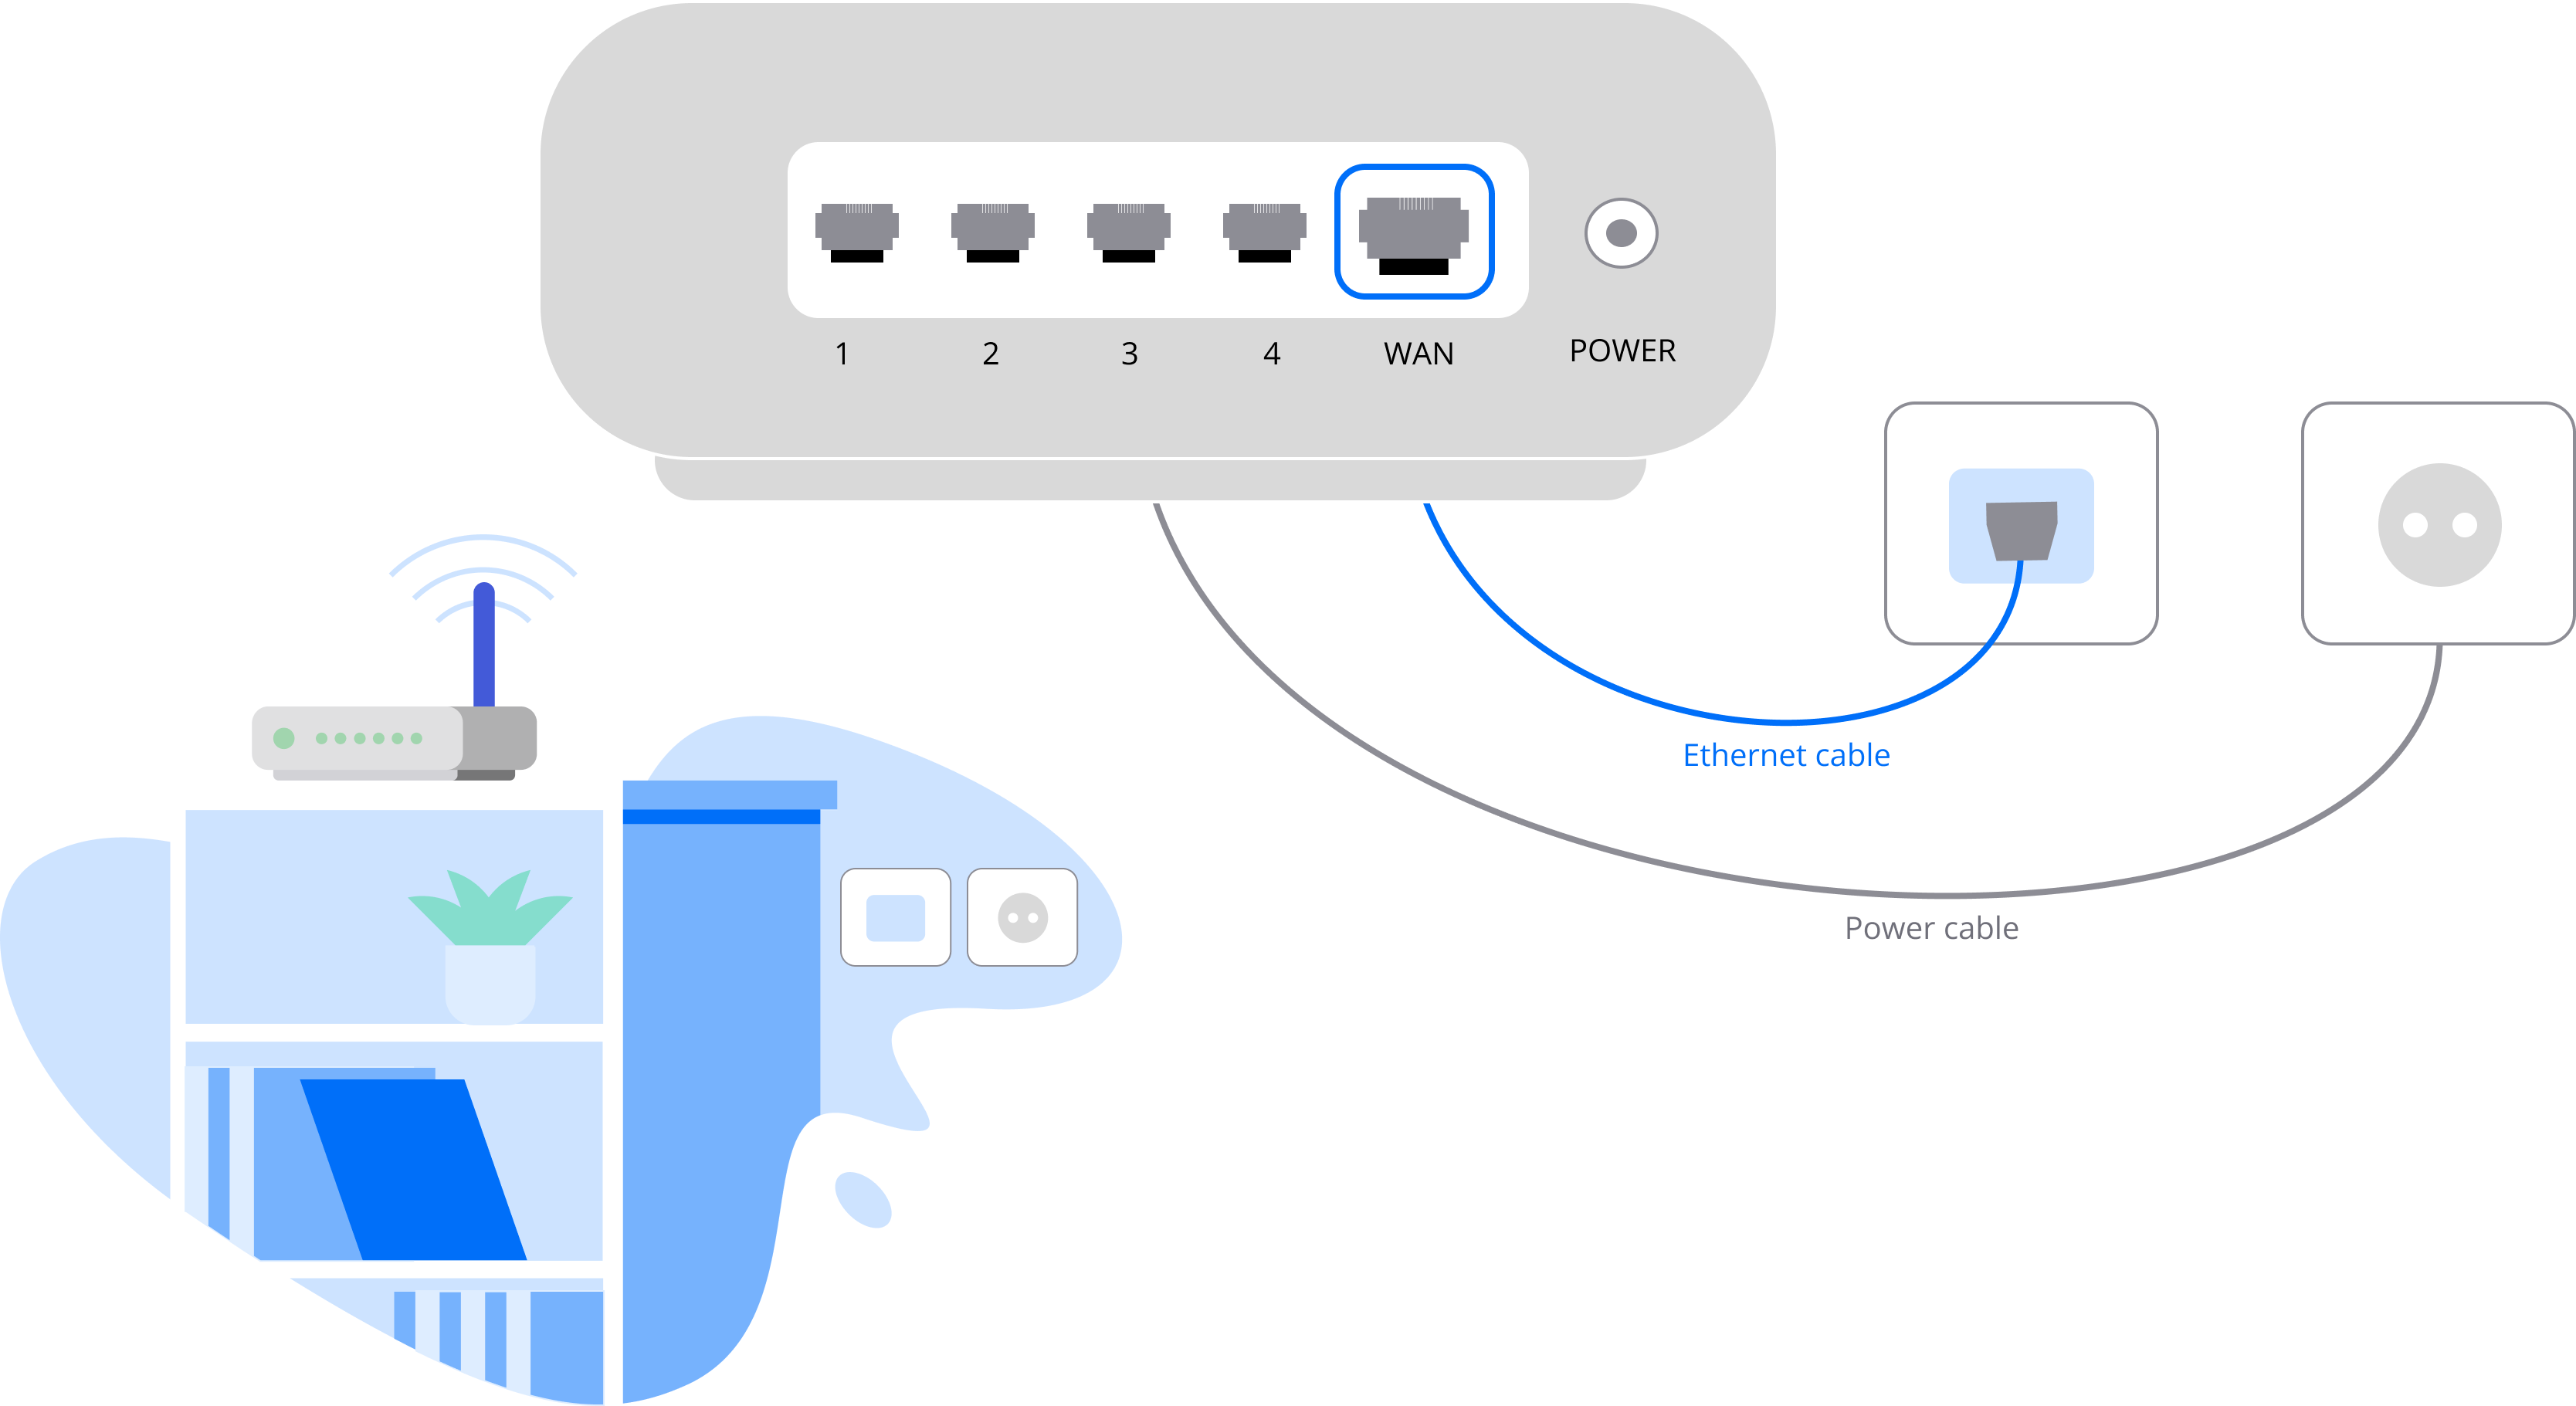
Choose a room and location that has a wall ethernet socket. The router will be connected to this socket to bring the internet into your home.
For best coverage, place the router openly and visibly, for example on a shelf or table. This helps it distribute the signal evenly to all your devices.
Avoid placing the router in an electrical cabinet, closed cupboard, or corner, as this may weaken the signal and cause connection issues.
Next:
- Connect the cable from the router’s WAN port to the wall ethernet socket
- Plug the router’s power cable into a wall outlet
Step 3: Connect the cable from the distribution panel to the correct room
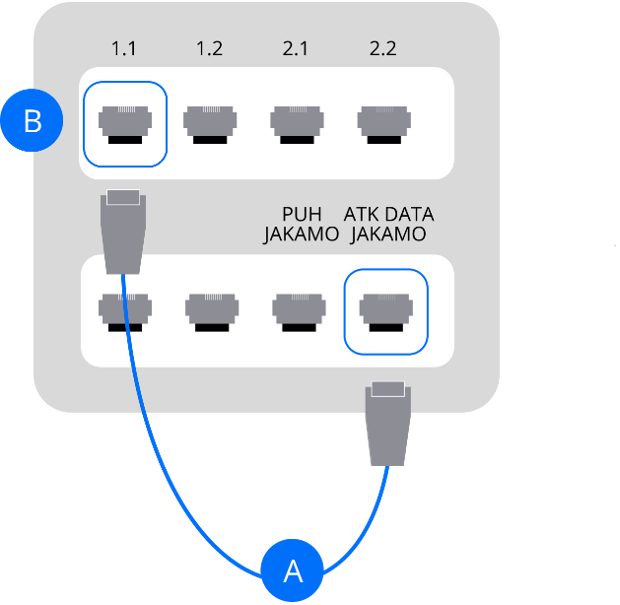
Your home has an electrical cabinet that contains (or is located near) the home distribution panel. This is where your internet connection arrives from the building’s internal network.
The distribution panel typically includes:
- One main data socket (shown as A), often labelled: ATK / DATA / NOUSU / JAKAMO
- Several other sockets (shown as B), labelled LAN / Ethernet, which route the connection to different rooms
Next:
- Connect a cable from the A socket to the B socket of the room where you installed the router.
→ This directs the internet connection to the wall socket in that room and from there to the router. - Make sure the router is connected and receiving power.
See the following instructions if your router’s indicator lights do not show an active connection or if your connection is slow
1. The distribution panel is connected to the correct room. We recommend trying the connection in different room sockets, as the rooms may be labelled differently and it is not always clear which socket corresponds to which room.
2. The cable is firmly connected at both ends, both in the distribution panel and in the WiFi router.
3. The router is powered on and all cables are securely attached.
4. Restart the router. Unplug the router’s power cord from the wall and plug it back in — this will reboot the device and may resolve connectivity issues.
5. Check the cable specifications. Ethernet cables typically have markings that indicate their category. Some older cables may limit your connection speed. Ensure you are using at least Cat5e cables, which support speeds up to 1000 Mbit/s. If you have subscribed to a faster connection, you should use Cat6 cables.
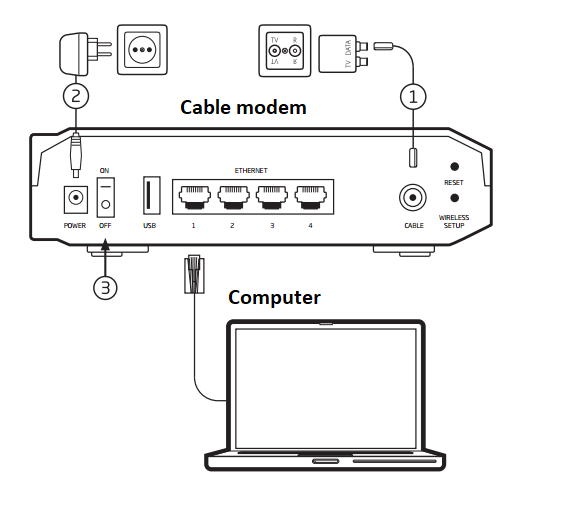
Install the subscription by connecting the cable modem to the apartment’s antenna outlet with an antenna cable. If necessary, the cable modem can be connected to the same outlet as the TV using an outlet divider (T-adapter). However, you should not use several dividers in the same outlet. You should also use a single antenna cable instead of an extension cable. Cable modems usually come with a divider. The cable modem should support the EuroDOCSIS 3.0 standard.
- Connect the modem* to the TV outlet on the wall by using an antenna cable (1). Use the divider that came with the modem if necessary.
- Connect the power cable (2) to the wall.
- Turn on the modem (3). When the DS and US lights are lit constantly and the “online” light is on (power/cable in a Fritzbox), the connection is ready to use. When using the modem for the first time, it may take up to two hours for the lights to turn on. The lights may be in different places depending on the model, please see further details on the modem’s instructions.
- Connect the computer to the modem’s wireless connection or a network cable to the modem’s Ethernet/LAN port. Learn how to connect to a wireless network here (FI).
*) We are currently offering the Kotiboksi TG2482 (Arris) modem for new connections. If you need a new cable modem device and are already using our connection, please contact our customer service. The modem is activated on an existing subscription, so they are currently not available at our online shop without a cable modem subscription.
Ensure the coverage of your wireless internet with our mesh devices (FI). Check the available devices at our online shop (FI). You can also order an Elisa Omaguru technician (FI) to install the devices for you.
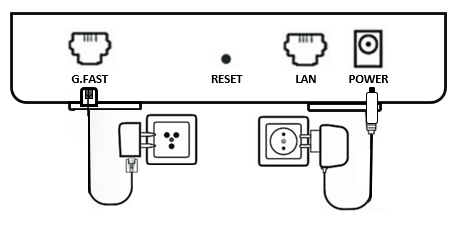
The connection is installed by connecting the G.fast modem to the telephone socket using a telephone cable. To share the connection at home, you need a separate WiFi router.
Activating broadband and connecting to the WiFi router
We recommend connecting the G.fast modem to a separate WiFi router so that you can use the internet connection wirelessly on multiple devices.
- Connect the telephone cable (RJ11) to the telephone socket in the wall and to the G.fast port on the modem. We recommend using the telephone cable provided with the device.
- Plug the power cable into the Power socket on the bottom of the modem and the power adapter into an electrical outlet in your home.
- Connect the Ethernet cable from the G.fast modem’s LAN port to the WiFi router’s WAN/WLAN port.
Now your wireless connection is ready to use! Learn how to connect to a wireless network here(FI).
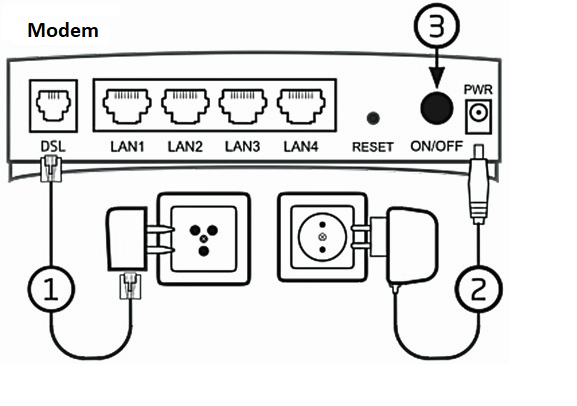
Install the subscription by connecting the modem to a telephone outlet using a telephone cable. You can use the connection once the DSL and internet lights on the modem are lit.
- Connect the phone cable (RJ11 cable) to the DSL port on the modem and the telephone outlet on the wall. We recommend using the phone cable that came with the device.
- Connect the power cable to the POWER port and the power source to the apartment’s electrical socket.
- Turn the device on at the ON/OFF switch.
- Connect the computer to the modem’s wireless connection or a network cable to the modem’s Ethernet/LAN port. Learn how to connect to a wireless network here(FI).
| We do not recommend using an extension cable or a phone cable that is over 2 metres long, as they weaken the connection strength. |
The device will update itself to the new software version automatically. The device is ready to use when the DSL and internet signal lights are constantly on. As you wait to activate the new subscription, you can make the mentioned preparations before the subscription is delivered and have the device ready and waiting to connect.
The installation instructions above are for the Kotiboksi modem. You can find further instructions for connecting a different modem in the guide that comes with your device. The models that are currently available for new connections are listed at our online shop (FI).
Ensure the coverage of your wireless internet with our mesh devices (FI). Check the available devices at our online shop (FI). You can also order an Elisa Omaguru technician (FI) to install the devices for you.
PLEASE NOTE: New and renovated buildings may have RJ11/RJ45 outlets instead of the traditional telephone outlets.
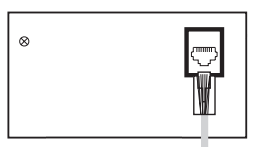
In that case, you can connect by detaching the traditional three-pole end from the telephone cable and connecting the cable directly to the wall outlet.
Internet problems after deployment? Narrow down the cause and fix it.